Low Rider: Materials and Cut Guide
A Low Rider is composed of three parts - a living unit, a storage unit, and a porch.
Materials
For a Living Unit, you will need:
6 sheets 3/8” plywood
1 sheet 1/2” plywood
23 pieces of 96” 2x4 stud
For the Porch, you will need:
1 sheet 1/2” plywood
6 pieces of 96” 2x4 stud
For the Storage Unit, you will need:
| Living Unit | |||||||||
|---|---|---|---|---|---|---|---|---|---|
| Panel | Stud | Plywood | Notes | ||||||
| 96" | 48" | 45" | 43.5" | 41" | 35.5" | 3/8" | 1/2" | ||
| Side | 2 | 3 | 40x48 | Reserve plywood scraps for gable caps | |||||
| Side | 2 | 3 | 40x48 | ||||||
| Front | 2 | 5 | 2 | 70x48, 24x43 | 24x43 is door | ||||
| Rear | 2 | 5 | 96x40 | Reserve scrap for overhang | |||||
| Floor | 2 | 7 | 88 1/2"x40 1/2" | 1 | 3/8" i | ||||
| Roof | 5 | 1 | |||||||
| Porch | 2 | 7 | 1 | ||||||
| Total | 8 | 5 | 14 | 5 | 4 | 13 | 5 | 1 | |
| Storage Unit | |||||||||
|---|---|---|---|---|---|---|---|---|---|
| Panel | Stud | Plywood | Notes | ||||||
| 96" | 48" | 45" | 43.5" | 41" | 35.5" | 3/8" | 1/2" | ||
| Side | 2 | 3 | 40x48 | Reserve plywood scraps for gable caps | |||||
| Side | 2 | 3 | 40x48 | ||||||
| Front | 2 | 3 | 2 | 22x48, 24x43 | 24x43 is door | ||||
| Rear | 2 | 3 | 40x48 | ||||||
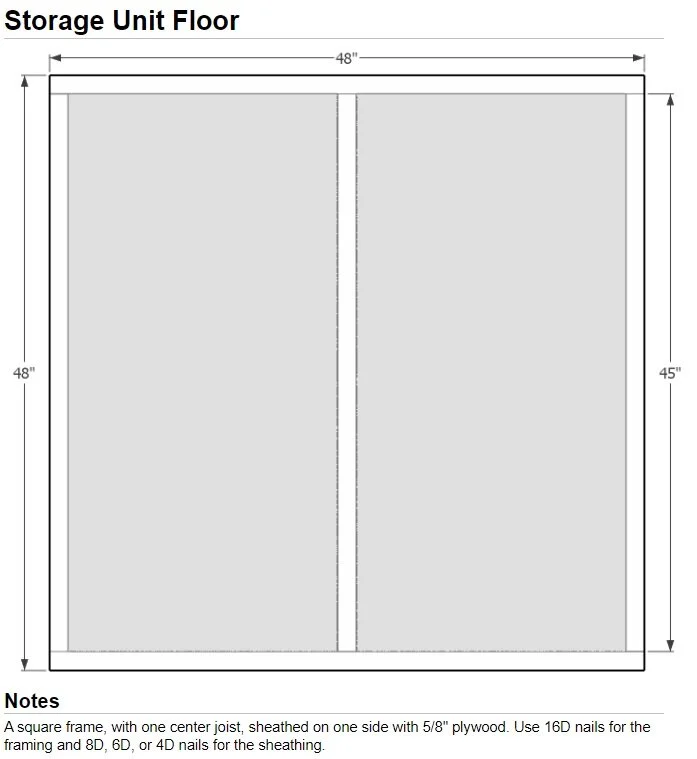
| Floor | 2 | 3 | 48x48 | ||||||
| Roof | 2 | 56x48 | Remainder from SU rear panel | ||||||
| Total | 0 | 8 | 3 | 3 | 4 | 11 | 3 | 0.5 | |
| Total Both Units | 8 | 13 | 17 | 8 | 8 | 24 | 8 | 2 | |
7 sheets of 3/8” plywood
3 sheets of 5/8” plywood
1 sheet inch-thick rigid insulation
50 96” stud (you only need 43 but get 50 for the inevitable mistakes)
One roll of roll roofing
One roll of mosquito netting
T-50 roofing staples for attaching roofing strips
1 lb. 3” wood screws
1 lb. 16d nails
1 gallon exterior waterproof paint
The Living Unit and Porch
The Living Unit is 8 x 4 feet on the ground, and is a little under 4 feet high in the front, dropping to slightly over 3 feet high in the back. (having a pitched roof)
Because it cannot be safely heated with a stove, the floor is insulated with 1) 1 inch thick sheet of rigid foam board insulation. The foam board is then topped with 1) sheet of 3/8" plywood. This both insulates the floor and builds it up to the level of the front panel's bottom plate, making it easier to sweep dirt out the front door. The insulation in the floor is added when the panels are assembled into the finalized hut.


Notes on Side Panels
Side panels are a little tricky. If approached carefully, they can be consistently built with little effort. Please review the side panel cut guide for notes on making the angle cuts.

To build a side panel:
Frame a "U" shape using the bottom 48" stud, and the two angle-cut verticals. Make sure that the slope of the verticals are pointing the same way, with the shorter vertical's slope pointing towards the longer vertical. Do not attach the top stud yet!
Attach the "U" to the sheathing
The bottom of the sheathing extends 1 1/2" past the bottom of the bottom plate. Since a 2x4 stud is actually 1 1/2" thick, you can use the top stud as a convenient spacer. First connect the bottom stud to the sheathing, then the sides.
Bring the top stud to the top of the "U"; it won't quite cover both of the vertical studs completely, but that's all right. Nail the top to the verticals, and then nail the sheathing to the top stud.
Repeat for the opposite panel, making sure that it's a mirror image of the first panel!
There are two common mistakes made with side panels:
The top edge of the sheathing doesn't quite align with the top edge of the stud. This is usually OK, as long as the discrepency isn't over 1/4". 1/2" is probably OK, but any further is problematic.
You've built two identical panels - "two left feet". You'll have to take one apart and rebuild. Good thing there are only four studs!
The Storage Unit
The storage unit is a smaller, simpler, uninsulated version of the living unit. Therefore, if you're building a Low Rider for the first time, you may wish to build a storage unit first.